November 24, 2015

Chocolate Pretzel Turkey bags

turkey

This was a fun project to do with my boys. We made these pretzel turkeys for their teachers (school and church). I was inspired by THESE pretzel turkey cups that my sister made. Since were were giving these away, I thought a bag would be better than a cup!

First step, dip the pretzels in chocolate. I used the Honey Wheat Braided Twists (instead of the pretzel rods), if only because I like the taste of these pretzels better ;)

IMG_4241

I used red, orange, and yellow Wilton chocolate melts. I gave each boy a small cup with melted chocolate and showed them how to dip them. They also had a few lectures on ‘not licking the chocolate or their fingers until they were done’ and ‘only eat the broken ones’. Man they had a hard time with those rules!!

IMG_4245

When they were done with the pretzels, and while the chocolate was drying, we worked on the bags. I printed out a coloring picture of a turkey head on sticker paper, and cut them out with my Silhouette. I also printed out a simple “I’m thankful for you” sticker that they could write their name on. So they worked on coloring those.

IMG_4247      IMG_4255

Stick the head sticker to one side of the clear cellophane bags and the “I’m thankful for you” (or “Happy Thanksgiving”) sticker on the other side, and fill with different colored “feathers” (the chocolate dipped pretzels), and tie it up.

Picture1

The best part of this project was watching the boys hand them to their teachers! So stinkin adorable!!

Picture1

More Family Hand Turkey blocks!

So many fun color schemes!!

[family of 6]
  IMG_4239 

[Families of 3 & 4, and a DIY set!]
 IMG_4238

Find these Family Hand Turkeys available at my Remembories shop.

HAPPY THANKSGIVING!!

November 2, 2015

Custom Gate | ODH

The progress on our ODH (operation dream house) project is slow going, but there is progress. This is our Grant’s latest edition to our property.

IMG_20151029_150126_964

Grant has been diligent about getting the land fenced to keep trespassers off (it was pretty open range land before we had it, and now everyone thinks they can still do whatever they want on it). Any chance he gets, he recruits our boys to help him! My brothers have even had the opportunity to help with the fencing project when they’ve come to visit!

IMG_20150525_153908_216

There was a lot of post setting & fence pulling, but it’s ALMOST done! This is the big post they set to hang the custom gate that Grant made. Little B is such an awesome worker (baby H and I just sat and watched ;)

IMG_20151014_105442_178

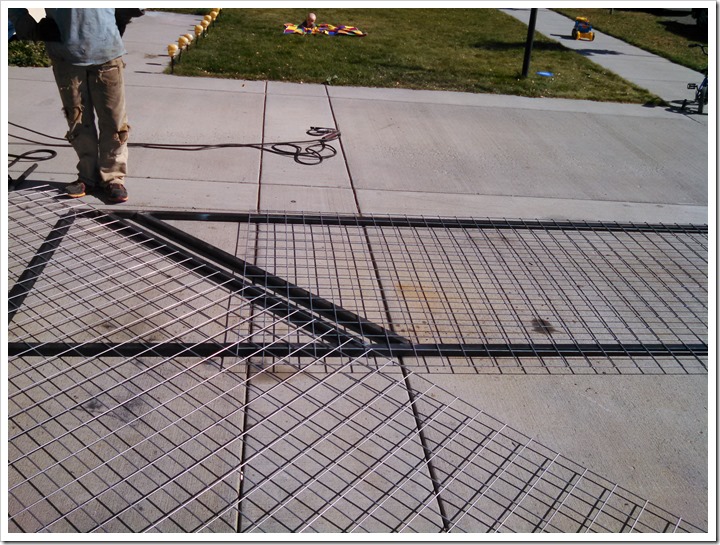
And now the gate. I’m ever impressed with Grant’s skills! We make a pretty sweet team – I design, he creates (and usually it’s EXACTY like I designed it). We had been talking about gates and what we wanted to do, and finally after a long discussion & a few sketches, this is what we decided on.

IMG_20151031_114918_262

He ordered the steel that night and had it started the next day when it was delivered. He also ran to the local ranch supply store and picked up some fencing.

Order list:

  • 2- 24’ pieces of 1.5” square tube, 14 gauge = $80-90
  • 1- 16’ utility panel fencing = $50
IMG_20151014_131747_467

He let me rearrange the fencing, switching it back and forth between diagonal and straight, and ended up deciding on the initial plan. It’s always good to consider the options ;) (his patience with me and my designs is amazing!). Once the layout was finalized, he went back to work and made these amazing gates in no time!

Tools used:

  • grinder
  • cut off saw 
  • welder

IMG_20151029_150116_801

We still need to paint them (black) and I’m thinking the smaller gate needs to be switched around so that the diagonal triangle part is mirror image to the big gate (so, put it at the bottom left instead of the top right). Once we actually build a house, we’ll change it from a swinging gate to a raise-and-lower gate. It’s gonna be fancy ;)

October 30, 2015

Halloween Bowling – pinterest success!

Tis the season for Halloween Bowling! I’m a cub master and a preschool teacher & put together these bowling sets for both groups to make this past week (at pack meeting and at a preschool Halloween party). They were a huge success, and so stinkin’ cute!!

IMG_20151029_120602_450

This project was a pinterest find, and I modified it a bit since I was making so many (12 sets) and had different ages (3 –10 yrs). The original version used 4 x 9” blocks, construction paper, googly eyes, and a bouncy ball. I made 1.5 x 6” blocks with vinyl stickers, and used a golf ball!

IMG_20151030_115029_556

What you need to make my modified version:

IMG_20151030_114925_418

Paint each board a different color, and let them dry. While those are drying, cut the vinyl stickers. I TOTALLY recommend a Silhouette machine, it makes projects like this so SO simple. All you have to do is open the template, load the vinyl & cut!

Once the boards are dry, and the vinyl is cut, it’s just a matter of applying the stickers. I showed the 3 year olds what it was suppose to look like (on the template), then they stuck them on how they wanted it to look. For the cub scouts, I just handed it to them and said, “put them together!”  The eyeball golf balls were simple too – use the sharpies to color in a black circle, then draw red squiggly lines all over it!

Then set it up and play!!

IMG_20151029_115148_756 

HAPPY HALLOWEEN!!