October 28, 2013

G WEEK

Last week was G week and we did preschool almost everyday this week (aside from the weekend). G might be little G’s favorite letter, because it’s HIS letter so I made sure to do a preschool day just for him. We also did Germs (hard one to explain the G sound for Germs), Garbage, and Ghosts.

Little G – (1) We started with the big letter G and traced it with his finger. Then he put little pictures of himself all around it (how to make stickers). We practiced writing his name a lot. (2) Then we did an “about me” page with random facts about him – his name, his brother’s name, his age, his birthday, his favorite color, etc. (3) Last, I wrote in his journal & had him write a little bit too, and draw a picture!
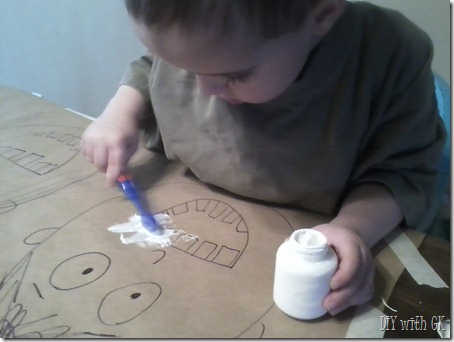
image

Germs My sister had a great activity for germs and showing how they get on your hands and can spread to other people. But it used glitter, and I HATE glitter. So I opted for a different germ activity. (1) I used the hole punch and make a bunch of “germs” (hole punched circles) our of green paper and then traced his hands on the paper and he glued the germs to his hands. (2) I made up a germ matching game. I found random germ clipart on google then put them on both sides of the page to match (I used Powerpoint to create it). (3) Another activity from my sister’s preschool blog – shoot the germs with a bubble gun. Little G of course LOVED this one, I don’t know if it was the gun or the bubbles, but he did this one for a long time. (4) Lindsy also suggested this activity – I drew faces on plastic lids and little G covered them with “germs” (washable green marker). Then he put soap on them and washed the germs off. He loved playing in the water!

image

Garbage – I coupled G is Garbage with Recycling. (1) The boys first watched a few youtube video of garbage trucks and recycling centers (these three videos - one, two, three). One is a 9 minute video and they sat there and watched the whole thing, almost without moving! Boys love trucks!! (2) I found random clipart on google of garbage and items that can be recycled. He put an X on the garbage and a recycle sticker on the items that can be recycled. (3) With more recycle symbol stickers in different sizes, he sorted them – small, medium, and large. (4) I cut that same recycle symbol in vinyl and used it as a stencil for the boys to make our own recycle bins (tubs from Target, about $6 each). They had a blast coloring them, I was stressed because they had permanent markers…never a good thing! (5) They practiced putting garbage, plastic, cardboard and cans in the right bins. Now we have those bins in our garage and I have little G recycle for us whenever we have something. He loves it. (6) We went on a bike ride and looked for garbage. We had a bag for garbage and a bucket for things they could recycle. We only rode around our neighborhood, but there were a few construction site so our bag and bucket filled up quick. Later that day we took a trip to recycle what we had for that day. They loved it!

imageimage

Ghosts – Ghosts was on Friday, so it was close to Halloween week (this week). We had a lot of fun with Ghosts. (1) Little G colored THIS twistynoodle page and practiced writing ‘G’, ‘g’, and ‘BOO’. (2) We made THIS ghost using cotton balls, little B liked this one! (3) I drew ghosts on the paper with white crayon and the boys used do-a-dot markers to make them appear. (4) Using a ghost clipart on google I made this page. Each mouth is a different color and he had to find the crayon that matched and color it. He circled the ghost that looked like a “real” ghost. (5) a sensory “ghost” bag for little B (filled with clear hair gel and foam craft paper eyes and mouth). He loves squishing it (little G loves SMASHING it). (6) We practiced saying what a Ghost says “BOOOOOO” (7) Little G mad THESE ghosts. I got them started and drew the lines for him to cut. I loved seeing how hard he was concentrating on following the line while he cut. (8) Ghost bowling – I used some plastic cups (a couple bucks at Walmart), drew ghost faces on them and stacked them up in a pyramid. They bowled, or in little B’s case threw the ball directly at it from 1 foot away.

image

Ghost snacks – string cheese with a ghost face & a plate with a B on it while eating Funyuns, to spell BOO

image

October 20, 2013

F week

Yet another week of preschool with my little guys. This week was F and we focused on Fruit, Fire/Firetruck, Family, Fall, and Fish & Frogs.

Fruit: 1) We started the week off with a big letter F and traced it with his finger then put fruit stickers on it (I made the fruit stickers using clipart from google images). 2) Using those same pictures, I made a chart with fruit down both sides of the paper and the letters that those fruit start with down the middle. He drew lines to the matching fruit & letters, and he also circled (or put squares around or “F”s on) the matching colored fruit. 3) We went grocery shopping that morning and picked out a bunch of different fruit (tried to make it very colorful). 4) I had him color sections of a paper plate the same colors as the fruit we had so that he could sort them. 5) After he sorted some of the fruit, we made fruit kabobs. 6) Lastly, we did F is for Friends. Little G wrote his friends names on bags and gave them some of the fruit kabobs, we went on a walk around the neighborhood and delivered them (to the friends that were home anyway!).

image

Fire: 1) We started with a twisynoodle.com page (fire). 2) I made put these coloring pages, using an outline fire truck (from google images) and put it together in Microsoft Publisher (really easy). 3) Then we worked on counting with THESE pages I printed and laminated. 4) Then we worked on tracing and sorting by size using printables from HERE. 5) THIS was a pretty neat and easy way to paint fire, the boys thought it was pretty cool using a fort to paint. 6) Later that evening we went and visited a local fire department with a group of cub scouts.

image

Family: I got THIS idea from my sister, a family tree using their hand/arm as the trunk. I printed off pictures of him, his mom (me!) & dad, and his grandparents on both sides. We talked about our family, and cousins, and aunts and uncles.

IMG_3299

Fall: For ‘Fall’ we talked about fall (falling down) and the other fall (autumn). Then he looked outside at the trees and we drew a picture with sticker leaves (from Staples $1 bins) and he wrote FALL. We went on a walk looking for all different colors of leaves. Using paint chips from Home Depot, he searched for those 6 colors of leaves and then he’d tape the leaves on that color when he found it. We also made some ‘colorful crayon shaving leaves’, little G thought it was especially awesome when the iron melted the crayon shavings! I was going to also make leaf cookies, but it didn’t happen. 

IMG_3294  IMG_3273

Fish & Frogs: 1) I tried to teach little G how to draw fish. It’s hard doing all those lines – straight, curve, zig, then zag, then up then down and all around…he could trace them really well at least. And he was good at drawing the face and the fins. 2) They dug for worms. We used this worm recipe to make some yummy worms ourselves, little G was the stirrer. When they were set and ready to be taken out of the straws, we put them in ‘dirt’ (crunched up chocolate animal crackers). They had a blast with this one.  3) Then we went fishing!! They have mini fishing poles, which are adorable, and they casted their lines over the couch (to me) and, using a clothes pin, I pinned a laminated fish (from google images) that had a little ziploc bag with a Swedish fish in it. Obviously they LOVED this one! Fishing AND candy! 4) We moved over to Frogs and using some foam craft paper that were cut like lily pads (from my sister!) and some little toy frogs, they played in the bathtub trying to keep the frogs on the lily pads. 5) Leap frog lily pad game – no picture, with foam craft paper, I cut bigger lily pads and put 1-6 on them. Little G rolled the die, counted the dots, then ran to that lily pad. Good counting game.

image

F WEEK!

October 16, 2013

Four-Wheeler, before & after

Grant likes to buy used things and fix them up, especially tools and equipment type things. Here is one of his latest projects that he purchased from craigslist.

image

It was a steal of a deal and actually I didn’t even know he was getting it. I took a nap one day and woke up to find him unloading it from our truck.

0823131934

It wasn’t in the best shape, definitely not what I would have brought home. It is a 1991 model and the seat was falling apart, the paint faded and chipped, it was rusty and had carburetor problems, as in it didn’t run.

0823131900

But Grant knows what he’s doing and can turn junk into treasures! After he fixed the mechanical stuff that needed to be fixed (for about $40) and got it running again, we started the makeover. I painted the green parts (fenders and gas cover), he painted the black stuff (bars and rails). It took a can and a half of Rustoleum 2x coverage Hunter Green spray paint, and about a can of Black spray paint.

  IMG_3175

The seat was next. Grant tried to purchase a brand new seat off of ebay but the sale fell through. Instead, he bought a water proof cover/tarp for about $20 and we made our own seat cover from it. Just a little bit of trimming and a lot of stapling!

IMG_3249  IMG_3264

And WA-LA! Looks as good as new, aside from the tires. It needs new tires BAD! One wobbles and a couple others leak around the rims. Other than that, it looks pretty sweet and not nearly as old, rusty and junk-like! Plus, it runs!

 IMG_3264IMG_3263IMG_3265

Total cost for the fixing and makeover = about $65. Job well done!

image

diy with gk


FEATURED ON:

lovelycraftyhome

October 13, 2013

E week

This week the boys were sick, so we again didn’t get as much preschool in as I had planned. Here are the days we did:

EYES: The main thing we did for eyes was the big letter E with googly eyes on it. Another activity we did was I blew up some balloons and drew eyes on them and taped them up outside (and each had a candy eyeball in them). They got to pop the color of ‘eyes’ that I said. I could tell they were getting sick because they didn’t even finish popping all the ‘eyes’, that’s unheard of with these boys!

IMG_3222  IMG_3163

EARTH: For earth little G colored the twistynoodle(.com) page of the Earth and wrote some letter E’s. We looked at Google Earth and saw where we live and where my sister lives (England) and where other family members live. He colored a blue circle and turned it into an Earth. Then we made earth cupcakes (white or yellow cake mix, with blue & green food coloring).

IMG_3223

ELK: The boys in this house are kind of obsessed with Elk (and it’s hunting season). I made this Elk page (using Trace font). We were going to go out in the forest and use Grant’s elk bugle, but again, they weren’t feeling good, so we had to pass and only colored this picture.

IMG_3224

EMOTIONS: I made some emotion face stickers and printed out this page of blank faces. We talked about different emotions and he guessed what emotion I was showing on my face and he tried to make it too. Then he filled in the blank faces with the different emotions. I also made a memory emotions game (little G doesn’t quite understand the concept of memory and taking turns, but we’ll get there!)

IMG_3225

E WEEK!

diy with kiley


FEATURED ON:

igamemomlifewithmoorebabiestrueaimblog

October 11, 2013

Fun sign I recently made - Schnoodie Cave

Another request from a customer that wanted a sign for a business. The “cave” portion is suppose to look like a cave opening or a mountain where a cave could be.

IMG_2456
[Remembories etsy shop]

diy with kiley

October 10, 2013

The perfect Halloween decoration (*easy & cheap*)

My holiday decorations throughout the year have been pretty lame. Halloween is when I actually put forth some effort..and even then it’s not that much! For our front deck I decided I wanted some hay bales and something spooky with it. We got some alfalfa bales instead, but they will just have to work for the next couple weeks. I picked up a bunch of clearance Halloween decorations last year, so we have a bunch of skull lights. One string was lucky enough to decorate the alfalfa, the other is in our flower bed.

As for the perfect touch to our front deck, all it took was a dead tree!

IMG_3167

I went to our land, found a dead tree, cut off a couple branches, then painted them black (with Rustoleum Black Matte spray paint).

downsized_1005131808a

Nothin like a spooky dead tree for decoration. And if you get down to the nitty gritty, it cost me about $1.77 in spray paint (didn’t use the whole can) and $.56 in gas driving to our land and back. Not a bad decoration for just a couple bucks!

IMG_3168

I had some smaller branches left over, so they went inside on our console table. Again, the perfect touch.

IMG_3198

diy with kiley

October 6, 2013

D week

Preschool this week didn’t happen as much as I had planned. It was one of those weeks – I was tired & busy, the boys were always cranky, we had errands to run, etc, etc. You know the excuses. But what we did do was: D is for Dots, Dinosaurs and Dentist. I had planned to also do: D is for Dogs, Dad, and Days of the week, but those just didn’t happen.

Dots: For our first day of preschool this week, we started with a big letter D and put Dot stickers all around it. Little G used some do-a-dot stampers and stamped on the paper randomly, then he connected the dots (dot-to-dot) and make a weird creature! On another paper he wrote a big D and a few more littler D’s and put more dots all over it. Lastly we used the candy Dots and worked on colors and patterns.

IMG_3008  IMG_3007
IMG_3006

Dentist: Nothing special today. We all had dentist appointments, and it was little G’s first one. Didn’t end up that great (he screamed and threw a HUGE fit). My sister was awesome and sent us this bookto get him ready for it! After our appointments we went to the store and bought new toothbrushes and toothpaste. I was going to have him do this activity (paint/brush their teeth), but he was pretty traumatized so we chilled the rest of the day.0228131046

Dinosaurs: We started with a page from a dinosaur Color Wonder book. Then we used some dinosaur stickers that I made and cut with my Silhouette (read how to make stickers HERE). He circles all the blue ones, put an X on the pink ones and drew D’s all over the page. He made a card for his cousin with lots of dinosaur stickers and letter D’s all over it. He included some stickers for her to use too. I was pretty impressed with how well he wrote her name and his name (with my help). I found some dinosaur capsule creatures(little pill shaped things that disintegrate and expand into sponges in warm water). The boys were pretty impressed and had lots of fun with those. Lastly they painted little wood dinosaurs that I got at the dollar store. Anytime they get to paint they love it.

IMG_3051  IMG_3050
IMG_3048

D WEEK!

Hopefully E week is a little more eventful and we get more done!diy with kiley


FEATURED ON:

igamemomlifewithmoorebabies