May 29, 2013

Upcycled Log Planter

I got the idea for this log planter from a random HGTV show that I watched years ago. It was a really easy project and took less than an hour to make. I’m sure I did it the hard way too!!

IMG_1136

Surprisingly this log was not cut by Grant! Instead we got it from an empty lot that just cut down a bunch of trees so they can start building. Grant was given permission and already took the majority of the larger, longer logs, but I wanted a smaller one for this project.

IMG_1122

I used a spade bit and drilled some holes pretty close together and fairly deep.

IMG_1123

Then I used the hammer and chisel to get more of the guts out and smooth out the edges. I finished it by using the drill again and basically used it like a mixer to make the hole bigger and deeper.

IMG_1124

I put a little dirt in it and then a couple free flowers we got from a local nursery. Pretty easy and super fast. I’m not the best green thumb out there, but hopefully they will actually keep growing and bloom! Now I want at least one more, but in a bigger log right next to this one by my front door.

IMG_1134


IMG_1125


Tools needed:  

*Drill
*Spade bit
*Hammer
*Chisel


**update** Grant came home from work and made the second one!
IMG_1144 IMG_1143

diy with kiley

May 27, 2013

Low maintenance flower bed

We did a little bit of yard work the other day. It’s definitely not one of our favorite activities, but we did it. What we worked on was the flower bed in front of our house. Something needed to be done because it was just growing weeds and turned into the boys dirt box to dig and play in.

First step, fill it with more dirt - FREE. Luckily we have some land not too far away, as skid steer and a truck, and we were able to get a scoop of dirt no problem.

Next, lay down some plastic. Normally you would use landscaping fabric for this part, but what’s the point of paying twice as much for “landscaping” stuff when you can buy “painters” stuff to do the same job.

IMG_1104

Grant found this plastic in the paint section at Home Depot. A HUGE roll for only $10. We used about 10 feet of it, maybe. So now we have more for our next project, if there is one (or just a huge slip’n’slide!!).

IMG_1108

Grant was awesome and made sure the plastic was tucked into every nook and cranny. There will be NO weeds growing in this bed! To make it stay in place we used the landscaping rocks in the front, and some homemade staples in the back – wire, cut and bent.

IMG_1106

There is no way anything is going to grown or even try to sneak up past that!

IMG_1109

Last step, cut holes for the plants (we had 5 different shrubs), plant them and top with some mulch/bark.

IMG_1118

We are absolutely NOT green thumbs. We have no idea what we are doing, nor do we really enjoy it as much as other things. It’s pretty much been last on our list for a while (years). But I will admit our front yard looks SOOOO much nicer now that we finished the flower bed (is that even what it’s called, it doesn’t have flowers in it, just shrubs?!). The best part, SUPER LOW MAINTENANCE (no weed pulling, EVER!).

diy with gk


FEATURED ON:

realfamilyfun

May 20, 2013

polka dot coat hangers

I have two little boys, and their room is always a mess. In fact, the whole house is always a mess! So to cut down on some of the mess, I made them some coat hangers for their room. Now we don’t have coats and hats hanging out by the front door or on the floor in their room.

image

First I had little G man help me find lots of random circles to trace. We used bowls, a lid, sandpaper, and a tape dispenser.

IMG_1036

I traced those on a 3/4” wide board (custom milled by Grant!), some of the little ones I traced a couple of times.

IMG_1037

Then I got to work on my scroll saw and cut out all the circles, then sanded the rough edges and tops.

IMG_1040

Then little G man helped me pick out the colors. His favorite was the green!

IMG_1042

I ended up using orange, green, red, blue & yellow paint, which matches the dresser knobs, shelves and stripes on the wall in their room. Paint each of the circles with a couple layers then top it off with a couple more layers of clear coat.

IMG_1044
[you can see on the spray paint board the outline of my Quote Wall that I made previously!]

I didn’t take any pictures of this part, but I laid out the hooks on the 4 bigger circles and marked where the screws needed to go. I pre-drilled the holes (smaller than the screws). To hang them, I hid the screw going into the wall under the hook.

IMG_1050  IMG_1051

Then I added the hooks. I didn’t want the placement to be right in the middle (mainly because the double hooks made the circles look like a cat face or some other animal, without the eyes, and it was bugging me!), so I put them randomly on the circles.

IMG_1052  IMG_1055

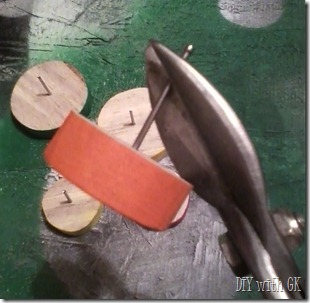
The really small dots I just hammered in penny nails and cut the ends off with aviator tin snips. That made them easy to hammer into the wall. **Add a touch of glue to the nails before you put them in the wall and they will actually stay. I tried just putting them on the wall without anything and they stayed, but were super easy to take off. I know the boys would have had a hay day with those weapons if they found out about them!

0518131940  0518131941

And the finished product, a fun little addition to their room.

IMG_1058     IMG_1056

Tools used/needed:
*1 x ___ boards (mine was custom cut by Grant)
*Random circles (bowls, lids, etc.) to trace
*Scroll saw
*Sandpaper
*Spray paint & clear coat (Rustoleum Ultra Cover)
*Coat hooks (I got mine at Target and Home Depot)
*Drill (drill and screw bits)
*Stud finger &/or drywall anchors
*Extra screws (for putting them on the wall)
*Penny nails
*Tin snips
*glue (opt)
diy with kiley


FEATURED ON:

realfamilyfun

May 18, 2013

Operation Dream House: part 1 – buying land

Grant and I have always wanted to build our own house. Ever since we moved here and bought our first house Grant has been on the hunt for a good deal on land. Then one day, all of a sudden Grant found a killer deal for 6 acres, 1.5 miles from our house. It had only been on the market for a couple days and within the week we were getting things going.

downsized_0505131719

We finally signed and paid for the land (with a stinkin loan of course) in the middle of January. Buying land (and homes) is such an ordeal, all the paperwork that has to be signed. I swear you have to make at least one mark on each and every page they give you, initials or signature. But that part is long over and hopefully we wont be doing that again for a while!

Step one of building our dream house is done! Now, for the next couple of years, we will be paying off the land, looking at house plans and deciding what to do with all that land! Every time I go out there I realize how huge 6 acres actually is. It’s a pretty fun process, but if only we had all the time and money in the world so we could just get started building!

downsized_0505131729

But for now, Grant is using it as storage for all of his huge logs, skid steer (bobcat), and sawmill parts…and now target practice with his new bow (early Father’s Day present). At least now our house doesn't look like a junk yard!!

diy with kiley